source: http://pokemondb.net/evolution
Saturday, August 13, 2016

Thursday, August 4, 2016
How to use bookmarks in word 2010
Source: http://www.howtogeek.com/howto/30918/use-bookmarks-to-navigate-word-documents-faster/
![sshot-2010-10-04-[00-33-33]](https://lh3.googleusercontent.com/blogger_img_proxy/AEn0k_uR5Im6rCNLFXknt-Jlqp8fM6i5-ikXFHy9c4RBt5mId3hy_4rlr50YYQ2QpgjFpLPF3r2_-lRVgjKtZNRgp3AdAXhIMMYgtb_Y6n-EDXUNdjLxgNzsG4Ldrl6WqkOlwom2dun0KLLLAYzVCV-VBu3TPmBnrXGIvdRK2Zy_zFjCNUpfq9jD0mtYcajMSYcOeOHw-8oVPYyw_zf0ElJghG7Juy4PsJF74LKrdE3r7OSXHArAtM3OX-fbaB0=s0-d "sshot-2010-10-04-[00-33-33]")
![sshot-2010-10-04-[00-34-21]](https://lh3.googleusercontent.com/blogger_img_proxy/AEn0k_vxinhdXkf1D7LjfftePLPxEGKI3idIe7RAvk5bfY7DHqQw-WIjtmTGRfJPJcUtMIccyojuCploKWXD1oKjJOR8Tuc83J6dIC0dNMh5Oe3neUN9PXSijMyylFXL_GqKLFPbtUh_SxVmGw0CyQmbUlvYYB6PgA=s0-d "sshot-2010-10-04-[00-34-21]")
![sshot-2010-10-04-[00-35-40]](https://lh3.googleusercontent.com/blogger_img_proxy/AEn0k_uEZOzO-g70EBYW8ftBFYHnB2WOSzU5qB3wO7V3o67yALNmGMVPa9UVzb-JHqtPIHK6-qEEZCxQJg73eXNQW1YzgYXXpanLe9weXwNPxKNZ0km2vmYIfqNZr7XmYhr-HwL5Oo-MR5vn_gXr7bPuM7FD0HlurQ=s0-d "sshot-2010-10-04-[00-35-40]")
![sshot-2010-10-04-[00-37-21]](https://lh3.googleusercontent.com/blogger_img_proxy/AEn0k_uYmwI-9RgEUIpidGnRzS-KLocAp7NxYjRmfg7Rp_bAoZFquFhT_PmXfzfVaqmbegzS5XGWx4cGjHE7qY4WUIqjrmMlYF5gGL2oS3tsfyweta1KIjGLGu82A1ZUPqgrNdZq85IYL7NV26xaCkQkEpv11NSRpg=s0-d "sshot-2010-10-04-[00-37-21]")
![sshot-2010-10-04-[00-39-44]](https://lh3.googleusercontent.com/blogger_img_proxy/AEn0k_sT78-k7tmgFOo3_ZlR_Cx3hkzI2qh6CTgqb86LXaCSjMxPKuLGJWHJo4oiSU3cHMx-hqVxXAJ_AYOYs8VzmsSPKvD8l17iJUJyg1CS0NUkEKseFsnybrq2SFmsnP5N53Lu4VYb4-3Y-uEppTpB3ocEsuy6HpFdDfqYDL0nQy99Tutjr2trUn9XiYGckqj6qP9ZVteb7uprpSvHwi4YOdaJfvQ8EnE7xhOjzAahDSwsvTJaSqRALAHbpg=s0-d "sshot-2010-10-04-[00-39-44]")
![sshot-2010-10-04-[13-36-41]](https://lh3.googleusercontent.com/blogger_img_proxy/AEn0k_tW5LbiEtcnegm_sXQcWxphi-XwhJBp-yuJh6rdTlkSMqsKjIHT0_QVibz-odM9fHp96ybnrKoWCA-k9OFIhD-v3nGKUc_4wMYxnjH8krfg-VbCTueuYN9Gkloo0csofMwIASsQ922CdrnURWSuw4t1ShcL1tRtNX2gnY4Zk7n_g3C4oHJyyBIg1Z9wb0opDK2-olmVowPHo4u5PKQN5gflK2n7amC2W5HI2Y_SNcVULJImiSpAZ5sS1HQ=s0-d "sshot-2010-10-04-[13-36-41]")
![sshot-2010-10-04-[13-37-59]](https://lh3.googleusercontent.com/blogger_img_proxy/AEn0k_uxk1blwEetfl3_G0vmo_KkMTxo7iXug1ipZrnaVfw5I4c71IFjLlMNUF87PeNPr639R6a23pvxkZZc5aeOuK-7XFtoOt4FrECL_jAQkje8cfa8W-92PvVVsoOERqXt9A4RKaNYWLiK9pPFFpPjlAmrXD-BV7BEupCpgPNJ10fPIKlb3qfbtywTSZYqlVWt0j3R4RLqiiDSSkS8jWEVZ2G01O7yqb5wcuM3vDWs45Uxg6WR-U5aLWkLAi0=s0-d "sshot-2010-10-04-[13-37-59]")
![sshot-2010-10-04-[13-39-04]](https://lh3.googleusercontent.com/blogger_img_proxy/AEn0k_s152WMz2jvOUxiohrt54HfD7itEglp1ff0QM89dqlj2V8mcAFsYlm54rhd76WtTptS7ZnsQGTa4OSXOcUCJ2NPUkpgsrORZvkIfDPinEvKiz94-vKk17hgSLqu4PC2ZyfCGen5z9VHFTBnqrozmRooy_ByXpaQTpEdMoQhsOGlvR7CorZHDn_xkqtok7M5PvFOJypHul8VNeDMeCnIojAOLU9D5WIP_nh4Wwsm0LKXzHSB2g5wF2XwLhY=s0-d "sshot-2010-10-04-[13-39-04]")
![sshot-2010-10-04-[14-09-01]](https://lh3.googleusercontent.com/blogger_img_proxy/AEn0k_sv_12p7AFajpF6XKpFGTdC5z3U21V4DtImrUgwMO6lCsoVeb_MYPPxOK1HNlYnNX1uTc6HDLVJXNIvIqAdK_j8LuicP4uIXvNJM4WfrQdayyUFSl-QokjNj4y8ycascITq1iGJM7QWQlZhum1PzKgBeQdIbQ=s0-d "sshot-2010-10-04-[14-09-01]")
![sshot-2010-10-04-[14-10-03]](https://lh3.googleusercontent.com/blogger_img_proxy/AEn0k_vax7-6AOj5yFoq-lBSOCBKNqKO1f1nTAkp8c5bczd5dXssGjo1I0uIi2qJXs39u_TgavOBGtH9mWez3vwhLTMd2fxlD3ot6MeyO3kKIgj4nduKJPlAoe0DI58PPUDpPq2icV3q18J0tBO6WDhCFbMtAOGXw1C3rmvCFi-Gp-upyFY1POCrEGQaVkNSW9DBF31z2nmnuapF7ur78Ugb0vm7PZOAqdvEGKE_8dpsRjn6E3ak45H-wia0ag=s0-d "sshot-2010-10-04-[14-10-03]")
Have you ever had a large Word document and needed to get to a specific part of it quickly? Here we take a look at how to add bookmarks to sections of documents in Word versions 2003 and later.
Add a Bookmark in Word 2010, 2013, and 2016
To create a bookmark in a specific area of a Word 2010, 2013, or 2016 document, simply place the cursor where you want the bookmark.
Then under the Insert tab on the Ribbon, in the Links section, click on Bookmark.
A Bookmark dialog comes up and you can give it a name. You have to use letters and / numbers without any spaces or special characters. After you name it click the Add button.
So in this example we’re reading a different part of the document and want to go back to the bookmark we just made. Click on Bookmark again.
The Bookmark dialog comes up where you can select which bookmark you want to go to. Notice here we have three bookmarks, you can essentially add as many as you need.
Bookmarks in Word 2007 & 2003
The process if pretty much the same in Word 2007 & 2003. Open your document, select where you want a bookmark, click the Insert tab, then Bookmark on the Ribbon.
One of the neat things is when you enter bookmarks in a Word 2010, 2013, or 2016 document, the same bookmarks are also available when you open the document in Word 2003 or 2007.
NOTE: You need the Office Compatibility Pack to open Word 2010, 2013, or 2016 documents in Word 2003 or 2007.
You can show hidden bookmarks and navigate to different locations throughout the document that way as well.
The feature is included Word 2003 too, so no matter what version of Word you’re using, you’ll be able to navigate through long documents faster.
Remember that if you create a document as a .docx in Word 2007 or later and want to open it in Word 2003, make sure you first have the Office Compatibility Pack installed.
Adding a Bookmark or two is a great way to navigate to specific parts of large documents. It’s much easier than scrolling through the entire thing.
Monday, August 1, 2016


Tuesday, July 5, 2016
Using Mendeley to create citations using LaTeX and BibTeX
Using Mendeley to create citations using LaTeX and BibTeX
a high-quality typesetting system; it includes features designed for the production of technical and scientific documentation.
And now let me introduce you to BibTeX too:
a tool and a file format whichare used to describe and process lists of references, mostly in conjunction with LaTeX documents.
Ok, so we’re now acquainted with LaTeX and BibTeX. Let’s see how we can use these tools along with Mendeley Desktop to get you citing and writing your manuscript.
BibTeX preferences
Go to Mendeley Desktop preferences, select the BibTeX tab. Once there, tick the box labeled “Enable BibTeX syncing” and select one of the options you prefer. I chose the middle one, “Create one BibTeX file per collection”. This generates one . bib file for each folder you create in Mendeley Desktop.
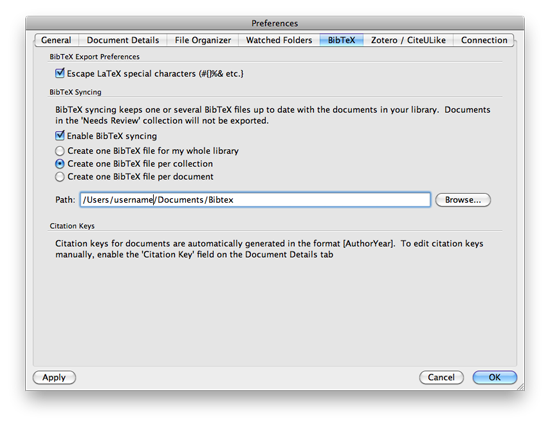
Autogenerate . bib file(s)
The next step is to create a folder where you will store all the articles or references pertaining to your manuscript. This will generate a . bib folder as per your settings in the preference menu.
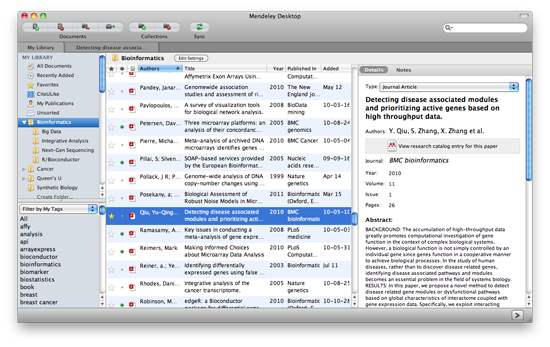
Any articles or references added to a given folder are automatically synchronized and changes reflected in the . bib file with the same name as the folders you created. In my example, I have a folder I labeled “Bioinformatics”, therefore Mendeley Desktop automatically generates a Bioinformatics. bib file with all the document details for the references within that folder.

Any articles or references added to a given folder are automatically synchronized and changes reflected in the
Citing in LaTeX
Here’s where the cool (and the only complicated) part is: writing your article using LaTeX syntax. There are great resources online to learn LaTeX, such as this one. However, what I really wanted to show you is how to add citations using LaTeX and your automatically generated BibTeX file (. bib).
In the following image, you can see an example LaTeX file (. tex ) where I’ve added some dummy text, and in the middle you will see two citations from my . bib file.
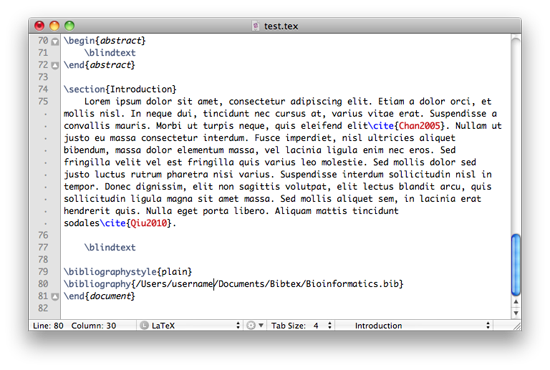
In the following image, you can see an example LaTeX file (
Generate your PDF
These citations are all I need so that LaTeX can generate a formatted PDF document with the appropriate citations and the corresponding reference list at the end of the document. Take a look at what the final product looks like below.

As a finishing note, I’d just like to mention that I’m quite a novice with LaTeX. This seems like a fantastically useful tool so far and I’m looking forward to improving my LaTeX writing and formatting skills. The Mendeley developers are always looking to improve these features, so we’d like to read about your experience and suggestions for improvements.
As a finishing note, I’d just like to mention that I’m quite a novice with LaTeX. This seems like a fantastically useful tool so far and I’m looking forward to improving my LaTeX writing and formatting skills. The Mendeley developers are always looking to improve these features, so we’d like to read about your experience and suggestions for improvements.
Monday, May 23, 2016
Cách kiểm tra phiên bản Android đang sử dụng là 32-bit hay 64-bit
Cách kiểm tra phiên bản Android đang sử dụng là 32-bit hay 64-bit
Source: http://tapchicntt.com/2016/05/22/cach-kiem-tra-phien-ban-android-dang-su-dung-la-32-bit-hay-64-bit/
(PC) Vài thao tác dưới đây sẽ giúp bạn biết được mình đáng sử dụng phiên bản Android 32-bit hay 64-bit.

Trong quá trình sử dụng smartphone Android, có thể bạn sẽ gặp câu hỏi về phiên bản Android đang sử dụng là 32 hay 64-bit, chẳng hạn như khi cài đặt phần mềm từ bên thứ 3, cài file APK.
Hầu hết các thông tin về điện thoại cũng như hệ điều hành sẽ có trong mục About Phone, tuy nhiên để biết về hệ thống 32/64-bit thì sẽ cần biện pháp khác.
Ở đây, chúng tôi xin giới thiệu một phương pháp đơn giản nhất, đó là nhờ ứng dụng AnTuTu Benchmark.
Ngoài chức năng đo sức mạnh, AnTuTu còn có thể phát hiện phiên bản của hệ điều hành.

Vào thẻ Info trong ứng dụng.

Thông tin về phiên bản hệ điều hành sẽ được hiển thị ở đây.
Tuesday, May 3, 2016
Chặn những người 'xài chùa' Wi-Fi bằng smartphone
Chặn những người 'xài chùa' Wi-Fi bằng smartphone
Source: http://news.zing.vn/chan-nhung-nguoi-xai-chua-wi-fi-bang-smartphone-post646842.html
Nếu cảm thấy tốc độ Wi-Fi bỗng nhiên chậm hẳn đi, bạn có thể áp dụng thủ thuật sau để kiểm tra và ngăn chặn những vị khách xài ké Wi-Fi.
Đầu tiên, người dùng có thể thử tải Fing tại . Sau khi cài đặt hoàn tất, hãy chạm vào biểu tượng mũi tên xoay vòng (Refresh) ở góc trên bên phải để Fing bắt đầu tìm kiếm.
Ứng dụng sẽ hiển thị toàn bộ thông tin bao gồm địa chỉ IP, địa chỉ MAC, tên và hãng sản xuất của các thiết bị đang kết nối vào Wi-Fi nhà bạn.
 |
| Tìm kiếm các thiết bị kết nối đáng ngờ. |
Nếu thấy thiết bị nào lạ, bạn hãy ghi lại địa chỉ MAC của nó (dãy số gồm 12 chữ số, được ngăn cách bởi dấu hai chấm) để tiến hành chặn trong bước tiếp theo.
Tiếp đến, người dùng cần tải công cụ NetCut tại đây. Thay vì phải đăng nhập vào router để lọc địa chỉ MAC, bạn chỉ cần cài đặt ứng dụng NetCut cho smartphone để thực hiện việc này nhanh hơn, yêu cầu thiết bị đã được root.
Giao diện chính của NetCut khá đơn giản, đầu tiên, bạn hãy nhấn nút Scan để ứng dụng tìm kiếm các thiết bị đang kết nối.
 |
| Chặn những vị khách xài ké Wi-Fi. |
Để chặn hoàn toàn những người xài ké Wi-Fi, bạn hãy chạm vào biểu tượng Wi-Fi trước tên thiết bị (máy tính, smartphone, tablet…), dựa vào địa chỉ MAC đã ghi trước đó để thiết lập chính xác hơn.
Ngược lại, nếu chỉ muốn ngắt mạng trong một khoảng thời gian cụ thể thì chọn vào biểu tượng đồng hồ, sau đó thiết lập thời gian tương ứng rồi nhấn Set.
Lưu ý, có hai mục không thể ngắt kết nối đó là This Device (thiết bị bạn đang sử dụng) và Gateways (modem/router). Ngoài ra, bạn cũng nên đổi mật khẩu Wi-Fi thường xuyên hơn để tránh bị người khác dò ra mật khẩu.
Subscribe to:
Posts (Atom)